Tuesday, July 17, 2012

Cook like it's 1917

I have made a promise to challenge myself while following along with America's Test Kitchen's "The Feed" as it cooks through the decades one week and one recipe at a time.  The first was Cold-Oven Pound Cake from 1905, which was not a great success in my kitchen.  The second recipe challenge was from 1917; Chicken a la King.

According to The Feed, Chicken a la King starting appearing on restaurant menus in the 1910s, but the exact origins are difficult to trace. The dish isn't descended from royals, but is instead believed to be attributed to a restauranteur by the name of King. Original recipes called for egg yolks and sometimes even truffles.

In my family, Chicken a la King was one of those things that got thrown together as a way to use up cooked chicken, vegetables and bread that was starting to get a little dried out.  The America's Test Kitchen version of Chicken a la King definitely falls into the "not the easiest to make" category.  It was a lot more laborious than my usual throw-together recipe (or non-recipe as it were).  In the end, it had good flavor and texture, with a nice finish of lemon juice and fresh parsley.  Using Italian bread which is buttered on both sides and toasted in the oven was one of my favorite parts of the recipe, which resulted in a nice crunchy yet "fork-friendly" base for the velvety sauce.

All in all, this recipe was a success; so much so that I submitted this photo of me, my darling daughter and the dish to The Feed.


It won me an America's Test Kitchen apron signed by Bridget Lancaster and a copy of the "From Our Grandmother's Kitchens" cookbook.  You can see us featured here:  Cook Like It's 1917: Winners!

Feel free to try the recipe and let me know how the dish turned out for you.  If you can't access the recipe, leave me a comment or shoot me an e-mail and I'll share it with you.

Next stop:  1924 - Ambrosia Fruit Mold

Tuesday, July 10, 2012

Cook like it's 1905

I love America's Test Kitchen.  Love it.  Their recipes may not always be the easiest, but they never disappoint.  Until recently that is, when I tried to make a Cold-Oven Pound Cake.  One of America's Test Kitchen's websites, "The Feed" is doing a "Cooking Through the Decades" series.  They are exploring the 20th century, 100 years worth of American cuisine, one decade at a time, through weekly challenges to the site's visitors.  The first challenge was Cold-Oven Pound Cake, a recipe from 1905.   

What the heck is Cold-Oven Pound Cake you ask?  I asked that too, with my initial thought being "How can you cook something in a cold oven?"  According to The Feed, when gas ranges were initially being sold, they didn't appeal to women who were used to oil and coal ranges.  So, as a marketing technique, these new ovens were billed as time savers, because you didn't have to preheat the oven to start baking.  As was the case with this cake.  You just throw it in the oven, turn the oven on and check on it when the time is up.  So I resisted the urge to preheat my oven and started whipping together the recipe.

 
America's Test Kitchen cake


The recipe itself looked delicious, loaded with butter and sugar, with the appearance of a chiffon cake but without all of the effort.  I mean, look at that photo.  Doesn't it look amazing?

I followed the directions perfectly, but in the end, I was disappointed.  I can't quite describe the "crumb" that I ended up with.  The center was like hardened gelatin or something, the whole cake was far too dense and it ended up being a squat cake instead of the high, fluffy one pictured.  I knew I didn't do anything wrong, so why would my cake have turned out this way?

Delicious Dairyland cake


One of the things I love about America's Test Kitchen is that when something doesn't work out, you can e-mail them, Tweet them, Facebook message them, whatever, and you actually get a response.  From a real person.  Here's what Belle at America's Test Kitchen had to say regarding my failed attempt at the recipe:
"We have not had similar experiences with this cake so I cannot tell you for certain what may be going wrong, but I think it may have something to do with the heating cycle of the oven you used. Some ovens cycle very high and then shut off to maintain a constant temperature of say, 350 degrees. If this happens the cake will overbrown on top and will “set” before it has time to cook through, thus the heavy, flat cake you described.  Unlike most of our recipes, the novelty of this cake’s cooking method, ie beginning in a cold oven, does present an unknown variable that cannot be avoided...And in this case, you can blame your oven, not your baking skills."

Okay, so the cake didn't technically turn out, but that didn't stop me from eating pretty much the whole thing within a couple of days.  The flavor was awesome (it can't be all that butter and sugar, can it?), so I am sure I will try to make this again sometime down the road.  Maybe after I have bought a different oven.  So now, I implore all of you, try the recipe and let me know what kind of results you get.  And don't forget to bring me a slice!  If you can't access the recipe, leave me a comment or shoot me an e-mail and I'll share it with you.

As for me, I plan to try every historical recipe in this series.  Next stop:  1917 - Chicken A La King.

Thursday, July 5, 2012

Balsamic Grilled Chicken & Vegetables

I am always looking for new recipes for chicken.  It can get a little "blah" when you have it over and over again.  Since it's the middle of summer, it just seems so easy to throw some boneless skinless chicken breasts on the grill, which is great because it limits the amount of dirty dishes you have to take care of once meal time is over.  Unfortunately, you can sometimes end up with dry, flavorless chicken breasts that no one really wants to eat, except for the fact that they have those nice little grill marks on them.  I recently threw together a marinade that gave chicken breasts amazing flavor and kept them moist throughout cooking.  I didn't plan ahead, so the chicken didn't have much time to marinate, but the flavor was great and a real surprise.  It went together quick and there was zero clean up.  I also threw some veggies in a similar marinade then skewered them to make kabobs.  Again, zero clean up.  Score!

The next day I had some leftover balsamic grilled chicken on top of my strawberry spinach salad with poppy seed dressing, and it was TO DIE FOR!  I recommend you give all of these simple recipes a try.  You'll be glad you did.


Chicken Ingredients:
1 1/2 lbs. boneless skinless chicken breasts
1/4 c. balsamic vinegar
1/4 c. olive oil
2 T. brown sugar
1/2 t. garlic powder
1 t. salt
1/2 t. pepper

Method:
Preheat a charcoal grill or indoor grill pan set over medium heat.  Slice chicken breasts in half lengthwise to create two thin chicken pieces (Doing this will help the marinade permeate the meat and they will cook faster, which means eating sooner).  Set aside.
Combine vinegar, oil, sugar and seasonings in a large zip-top storage bag.  Shake bag and knead with hands until ingredients are well-combined.  Add chicken and toss to coat.  Store in refrigerator for 30 minutes to an hour, or as long as it takes your grill to get going.  Remove chicken from marinade and grill over medium flame/heat until cooked through, turning once about halfway through the cooking process.  This took about 5 minutes per side over direct heat on our charcoal grill.   

Vegetable Kabob Ingredients:
1-2 lg. sweet peppers (red, yellow, orange, green), cut into chunks
1 lg. onion, cut into wedges
1/2 lb. cremini mushrooms, cleaned and stemmed
1 small zucchini, cut into chunks
1 small yellow squash, cut into chunks
1/3 c. olive oil
1/4 c. balsamic vinegar
2 cloves minced garlic
1/2 tsp salt
1/4 tsp pepper
1 tsp dried rosemary

Method:
Preheat a charcoal grill or indoor grill pan set over medium heat.  Combine oil, vinegar, garlic and seasonings in a large zip-top storage bag. Shake bag and knead with hands until ingredients are well-combined. Add vegetables and toss to coat. Store in refrigerator alongside your chicken until you're ready to grill.  Remove vegetables from marinade and place on wooden skewers that have been soaked in water for 15 minutes (or if you have one of those fancy metal kabob sets, that would be awesome).  Grill over medium flame/heat until vegetables are tender, turning occasionally, about 10-15 minutes.

Click here for the printable recipe!

Tuesday, July 3, 2012

Flag Cake - My Way

Tomorrow is the Fourth of July, and there is no better reason to make a dessert inspired by Old Glory.  There are tons of recipes out there for various flag cakes, but I didn't feel like making a standard rectangular sheet cake, I instead wanted a layer cake with a berry filling, so there would be red, white and blue throughout the cake.  I found a great filling to use on YumSugar using fresh blueberries and strawberries.

Then I had to figure out what cake to make.  I feel like if you are making a layer cake, you have to make it from scratch. Every time I have tried to use a boxed mix to make a decorated cake, it falls apart because the structure of boxed cake mix is just too weak.  I chose my grandmother's recipe for white cake.  I was lucky enough to get a handwritten cookbook from her as a wedding shower gift a couple of years ago and couldn't wait to give her cake recipes a whirl.  I think there are members of my family who don't even have my grandmother's cake recipes, so hopefully I won't tick anyone off by posting it online for the world to see.  It ended up being one of the easiest cakes I've made.  In so many cake recipes, you have to cream the butter and sugar, then add dry ingredients alternately with liquids.  This one uses vegetable shortening instead of butter and sort of just gets dumped together, so you don't end up with a bunch of extra bowls unnecessarily dirtied.  The most difficult part of the recipe was separating the eggs since I decided to make a white cake which doesn't have egg yolks.

Now, for the frosting.  I'm not a huge frosting fan, I'm always the one asking for a middle piece of cake because I want as little frosting as possible with my cake.  I really didn't want a cake that was sickeningly sweet, so I made a little whipped cream to layer with the berries, and then a cream cheese frosting for the outside of the cake.  I love cream cheese and I really think the tanginess of it cuts through some of the sweetness in a standard buttercream.

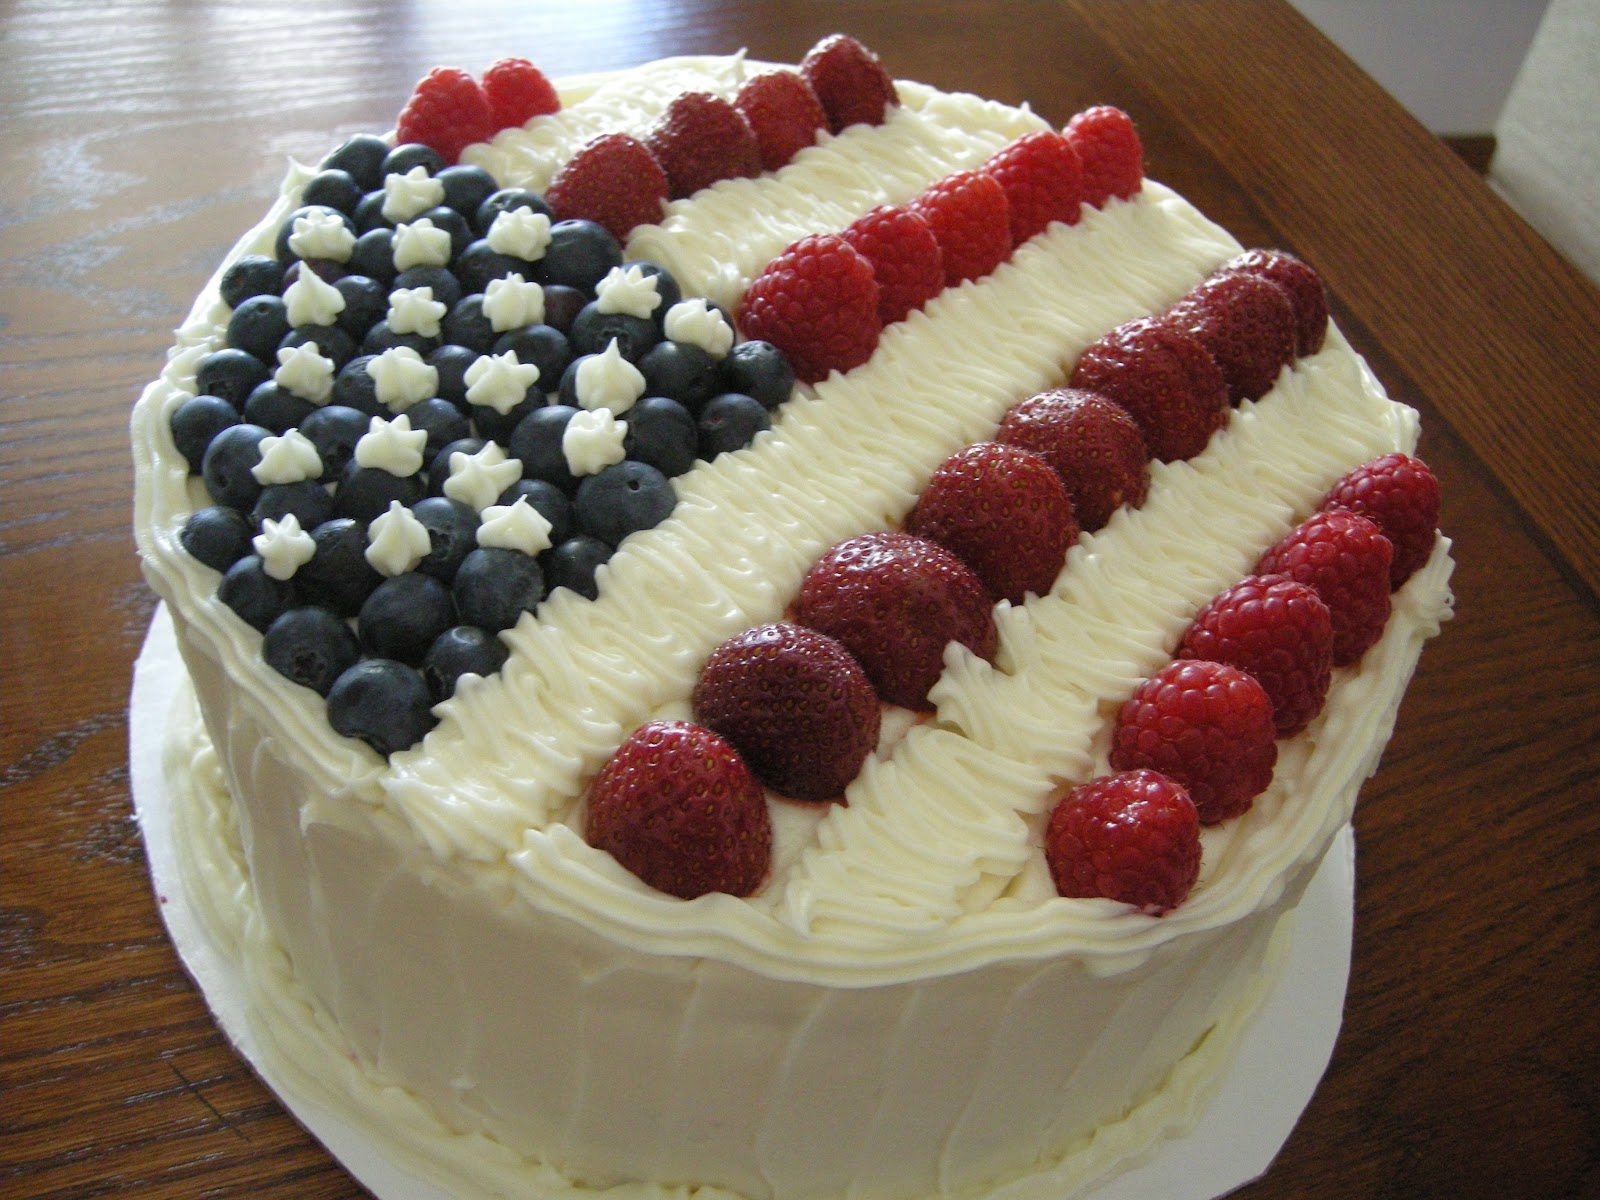
Decorated with blueberries, strawberries and raspberries, the cake looked almost too good to eat.  Once I brought myself to cut into my masterpiece, I was so glad I did, because it was probably one of the best cakes I have ever made.

Triple Berry Flag Cake (printable recipe)


For the Cake
Ingredients:
2 1/2 C. cake flour
1 2/3 C. sugar
1 tsp. salt
1 1/4 C. milk
2/3 C. vegetable shortening
4 1/2 tsp. baking powder
5 egg whites
1 tsp. vanilla

Method:
Preheat oven to 360 degrees.  Grease and lightly flour two 9-inch round cake pans.
In the bowl of an electric mixer fitted with a paddle attachment, combine cake flour, sugar, salt, 3/4 C. milk and shortening.  Beat vigorously for 2 minutes.  Stir in baking powder.  Add egg whites, remaining 1/2 C. milk and vanilla.  Beat for 2 minutes more.  Evenly distribute batter between prepared pans.  Bake for 30 minutes or until toothpick inserted into center of cake comes out clean.  Let cake cool completely before filling and frosting/decorating it.


For the Filling
Ingredients:
1 C. heavy whipping cream
4 T. sugar
1 tsp. vanilla
1 C. fresh blueberries
1 C. fresh strawberries

Method:
Place 1/2 C. of each berry along with 2 T. sugar in a medium saucepan.  Using a fork, roughly mash the berries.  Cook the mixture over medium heat until it starts to simmer, stirring often, for about 5 minutes.  Set a mesh strainer over a medium bowl and pour mixture through it, using a rubber spatula to push as much of the mixture as possible through the strainer.  Stir in the remaining berries and set mixture aside to cool.
Beat whipping cream with remaining 2 T. sugar and vanilla until soft peaks form. Set aside.


For the Frosting
Ingredients:
1 C. butter, softened (2 sticks)
1 pkg. cream cheese, softened (8 oz.)
3 C. powdered sugar
1 tsp. vanilla
1-2 T. milk
1/2 C. fresh blueberries
1/2 C. fresh strawberries
1/2 C. fresh raspberries

Method:
Combine butter and cream cheese in the bowl of an electric mixer fitted with a whisk attachment.  Cream together on medium speed, then add vanilla.  Turn speed to low and gradually add powdered sugar.  Add 1 T. milk and beat on high speed until mixture gets fluffy and and is perfect spreading consistency, adding more milk if necessary.


Assembling the Cake
Trim rough edges from cakes using a serrated knife.  Place first layer, bottom side up, on a serving platter. (*Tip - put strips of parchment paper under cake edges for easy clean up without ruining your platter).  Using an offset spatula, spread cake with whipped cream.  Spoon the berry mixture over the whipped cream.  Top with remaining cake layer, bottom side up.  Using about a cup of frosting, spread a thin layer over top and sides of cake (this is a crumb coat - it is a must unless you want little pieces of cake poking through your final product).  Refrigerate for at least an hour, or overnight.

Spread entire cake with about 2/3 of the remaining frosting.  Place remaining 1/3 into a pastry bag fitted with a star tip.  Use a toothpick to outline the shape of a flag on the cake.  Just before serving, fill the upper left corner with a layer of blueberries, then place a row of raspberries across the upper edge of the cake and pipe one row of frosting below it.  Repeat process, alternating raspberries and strawberries until you have covered the cake.  I didn't worry about making sure there were 13 stripes.  Depending on the size of the strawberries and raspberries you find, you may get more or less than I did.  Pipe a row of frosting around top and bottom of cake, just to finish the edges.

Enjoy!