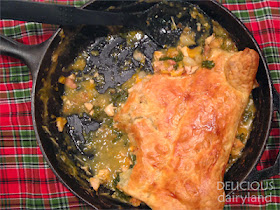
This ain't your momma's chicken pot pie...but at the same time, it is. It has all the comfort of a classic pot pie, but is fortified with awesomely nutritious ingredients like butternut squash and kale, which coincidentally, also make it even more delicious. And the best part - this is a one-dish meal.
I spotted this gem of a recipe on Bon Appetit's website when they were sharing 8 flaky filled treats in light of the recent recall of Hot Pockets. (gasp!) Seriously, if you're over the age of 20, there is no reason you need a Hot Pocket. Even if you're under 20, you still don't need them...but, I digress. I realized I had everything on hand to make the dish, and in fact, needed to use up some items that were about to wear out their welcome in the freezer.
I took about a hundred photos of this dish, but just wasn't happy with them. Some were taken with my phone, others with my Canon, but I just couldn't get the framing of the shot right, and I was working with horrible light. It was about 6:30 at night, prior to the switch to daylight savings time, so there was zero natural light to speak of, and only my recessed lighting over the countertop. I Photoshopped to the best of my ability and used some fun actions I found on Pioneer Woman. I think the actions would be awesome for quick adjustments to portraits. My photos of the finished pie do not do it justice. It was good. All creamy and luscious on the bottom and then all flaky crisp on top...totally scrumptious! I think some of the best photos came when I was cooking, when all of the great colors of the produce I was using could really show through.
 |
| All Hail Kale! |
 |
| All of the filling ingredients simmering away before I added the shredded chicken. |
Another note is that the cast iron skillet I have is big one, at 12 inches. The recipe is better suited for an 8 inch skillet as the recipe originally stated. I think a 10 inch would work just fine too though. If I had used a smaller skillet, the pastry would have covered the entire pan, which would have made for a lovelier finished product. It sure did taste good though!
Skillet Chicken Pot Pie with Butternut Squash
Slightly adapted from Bon Appetit Magazine
Printable Recipe
Ingredients:
1 Tbsp. olive oil
1 c. frozen white pearl onions, thawed
4 cloves garlic, minced
1/2 tsp. dried sage
1 small bunch kale, removed from stems, chopped
1/4 c. flour
3 c. chicken stock
1 1/2 c. butternut squash (about 1/2 of a small squash), peeled and cut into 1/2-inch pieces
2 c. cooked chicken (about 1/2 a rotisserie bird), torn into bite-size pieces
1 sheet frozen puff pastry (such as Pepperidge Farm), thawed
1 large egg
Sea Salt
Black Pepper
Method:
Preheat oven to 425 degrees F.
Heat olive oil in a cast-iron skillet (preferably 8 to 10 inches in diameter) over medium-high heat. Add onions and cook a few minutes, stirring occasionally, until they start to brown. Reduce heat to medium-low and add garlic and sage to the skillet. Cook, stirring occasionally, until garlic is fragrant and beginning to brown, which should take only a couple of minutes.
Add the kale and season with a generous pinch of sea salt and black pepper. Cook, stirring often, until the kale is wilted, about 5 minutes. Sprinkle the flour over the top, and cook, stirring constantly for 4 minutes.
Stir in the chicken stock, about a 1/2 cup at a time, then add the squash. Bring the whole thing to a boil, then reduce the heat and simmer until the squash is just softened and the broth has thickened, which should take about 10 minutes. Add the chicken to the skillet, then season to taste with more sea salt and black pepper.
Unfold the pastry dough and smooth out any creases to the best of your ability (I just couldn't get my creases to go away). Place the pastry over the skillet, allowing the corners to hang over the sides. Whisk egg and a splash of water in a small bowl or cup. Brush the top of the pastry with the egg wash and cut a few steam slits in the top to vent the pie.
Bake the pot pie until the pastry is beginning to brown, about 15 minutes. Reduce the oven temperature to 375 degrees F and bake until the pastry is deep golden brown and crispy, another 15 minutes. Let the pot pie cool for 10 minutes before serving.
Enjoy your Pi(e)!


